MIDAS - Micro-Imaging Dust Analysis System
 |
|
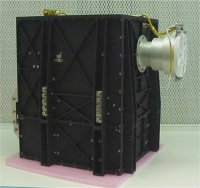
The MIDAS instrument. |
MIDAS is designed to collect and image dust particles collected in the vicinity around the comet. The measurement principle is based on atomic force microscopy. This technique allows for true three-dimensional imaging at nanometre-scale resolution. The instrument is built to investigate the smallest grain size fraction released from the comet's surface; it will also investigate the structural complexity of grain cluster up to a few microns (µm).
More than 60 collector facets, which can be individually exposed into the dust stream, and a total of 16 imaging sensors, guarantee continuous observations throughout the mission lifetime.
Scientific Objectives
Dust particles emitted from comet nuclei form a major source of information for the understanding of primitive matter in our Solar System. It represents remnant material from the early times of the formation comets, asteroids and planets some 4.5 billion years ago.
 |
|
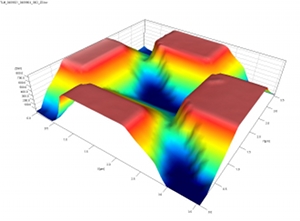
Topographic image of a calibration sample obtained during in-flight testing. Credit: ESA |
The prime scientific objective of the MIDAS experiment is to image the micro-topography and micro-textural units of cometary dust particles; this provides important information about the characteristics and nature of these particles, for example, about the composition of their primary building blocks. In addition, sub-features on clean crystal surfaces provide insight into either the growth conditions (twinning, screw dislocations) and/or storage environment conditions (dissolution marks).
Following the mapping of single particles with a resolution in the few nanometre range, many statistical parameters describe the cometary environment. This comprises the statistical evaluation of the collected particles according to size, volume and shape, but also temporal and spatial variations of the particle flux can be deduced.
In summary, MIDAS will meet the scientific objectives that have been established for this instrument when the following information can be obtained during the rendezvous with the comet:
- 3-D images of single particles with a resolution better than 10 nm
- Search for "very small particles" (10 nm)
- Search for evidence of euhedral (well-formed, sharp-faced) crystals
- Possible detection of ferro-magnetic minerals
- Size distribution of particles
- Variation of particle fluxes on time scales between hours and days
The instrument
Dust grains in the size range from 4 µm down to 4 nm will be imaged in three dimensions by means of atomic force microscopy (AFM). AFM makes use of tiny physical forces (van der Waals, interatomic, magnetic, etc.) that act on a sensor in closest distance to a surface.
 |
|
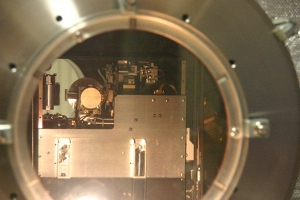
MIDAS flight spare instrument mounted in a vacuum chamber for further characterisation measurements. Credit: ESA |
The sensor is a 600 µm-long cantilever arm with an extremely sharp 7 µm-long tip mounted underneath. The sensor is controlled by a piezoelectric mechanical system that scans above the surface and senses its topography.
The dust particles enter the instrument via a funnel penetrating the spacecraft's hull and hit the collector surface. Sixty-four of these targets (coated silicon facets) are mounted on the perimeter of the dust collector wheel. The facet exposed to the dust stream is rotated and presented to the microscope, which approaches the surface automatically and starts the scanning (imaging) process.
Usually an overview image will be used to identify collected particles and the automatic zoom-in function takes a detailed high-resolution image at nanometre scale. A scanning strategy is defined so that data cis collected overing all grain size classes in the working range of the microscope.
Performance Specifications
Selected instrument performance specifications are summarized in the table below. The table compares specifications as stated in the original instrument proposal with their realization in the MIDAS flight model.
| Performance Parameter | MIDAS Proposal | MIDAS FM | ||||||||||||
| Max. lateral resolution | 4 nm | <3 nm* / 6 nm** | ||||||||||||
| Height resolution | <1 nm | <0.3 nm | ||||||||||||
| Scan field |
min: 1 µm max: 50 µm |
min: 0.4 µm max: 94 µm |
||||||||||||
| Image |
256 × 256 pixel >10 bit/pixel |
512 × 512 pixel 14 bit/pixel |
||||||||||||
| Max. duration of one scan | 1000 s | 4 h | ||||||||||||
| Min. number of scan fields on target | 10000 | 10000 | ||||||||||||
| Telemetry rate | 100 bps | 100 bps | ||||||||||||
| Image acquisition time | ~600 s | up to 4 h | ||||||||||||
| Image processing time | ~600 s | <240 s | ||||||||||||
| Stability of position | ± 1 pixel | ± 1 pixel | ||||||||||||
| In-flight calibration | Yes | Yes | ||||||||||||
| Mapping of unexposed target for reference | Yes | Yes | ||||||||||||
| Working modes | Contact mode |
|
||||||||||||
| Data channels | Topography |
|
||||||||||||
| *theoretical value, **measured value during instrument tests | ||||||||||||||
The flight instrument matches the predictions from the original instrument proposal. The flight model has some enhanced capabilities due to additionally implemented scientific working modes and extra data channels. The only variance is the length of time in which images will be acquired or further processed. Due to fewer processing capabilities than originally planned, the scan duration for one image exceeds the originally envisaged 600 seconds. However, neither the scientific value of the images nor the capability to obtain a sufficient database is limited by this design change. The overall scientific performance has been increased when compared to the initial proposal due to implementation of more data channels and advanced working modes.
Instrument commissioning and check-out during cruise phase
After a near perfect orbit insertion by an Ariane 5 rocket on 2 March 2004, the Rosetta spacecraft went on to an interplanetary course. The spacecraft and scientific payload have been tested extensively since then.
In the test sequence of the MIDAS instrument, which ran over five contact passes from the ground station to the spacecraft, the following results were obtained:
- Complete electronics checkout
- Cover opening by a pyrolytic device
- Unlocking of all clamp mechanisms
- Movement of linear stage and approach mechanism out of launch position
- Verification of all motors and mechanisms
- Verification of all 16 sensors by resonance search
- Verification of the scanner by imaging calibration surfaces
- Initial characterization of mechanical noise environment
The overall result of the MIDAS commissioning phase and subsequent instrument check-out demonstrated full functionality and performance of the instrument up to the moment the spacecraft (and payload) was put into hibernation in June 2011.
Collaborating Institutions
Principle Investigator:
M. Bentley, IWF, Austria
Hardware contribution by:
IWF Graz, Austria
ESA/ESTEC, Science Payload and Advanced Concepts Office, The Netherlands
Universität Kassel, Germany
Technische Univeristät Wien, Austria
Scientific advice from:
Institut für Geologische Wissenschaften, Universität Halle, Germany
Department of Physics, University of Sheffield, Great Britain
Institut für Geochemie, Universität Wien, Austria
Sterrewacht Leiden, Netherlands
Institut für Planetologie, Westfälische Wilhelms-Universität, Münster, Germany
University of Tromso, Auroral Observatory, Tromso, Norway
Université Paris 6, Aéronomie CNRS, Service d'Aéronomie, Verrières, France
Astrophysique du Solide, C.S.N.S.M., Orsay, France
